 TellPip
Give TellPip the macOS permissions it needs
Microphone, Screen recording and System audio: what each one is for and how to turn it on in a few clicks.
Updated 30 October 2026
Contents
macOS carefully protects what happens on your Mac: no app can use your microphone, see your screen or listen to your Mac’s audio without your consent. TellPip uses three of these permissions, each with a precise purpose. This guide explains what each one is for, how to grant it and how to check at any time that everything is ready.
1. The three permissions, and why
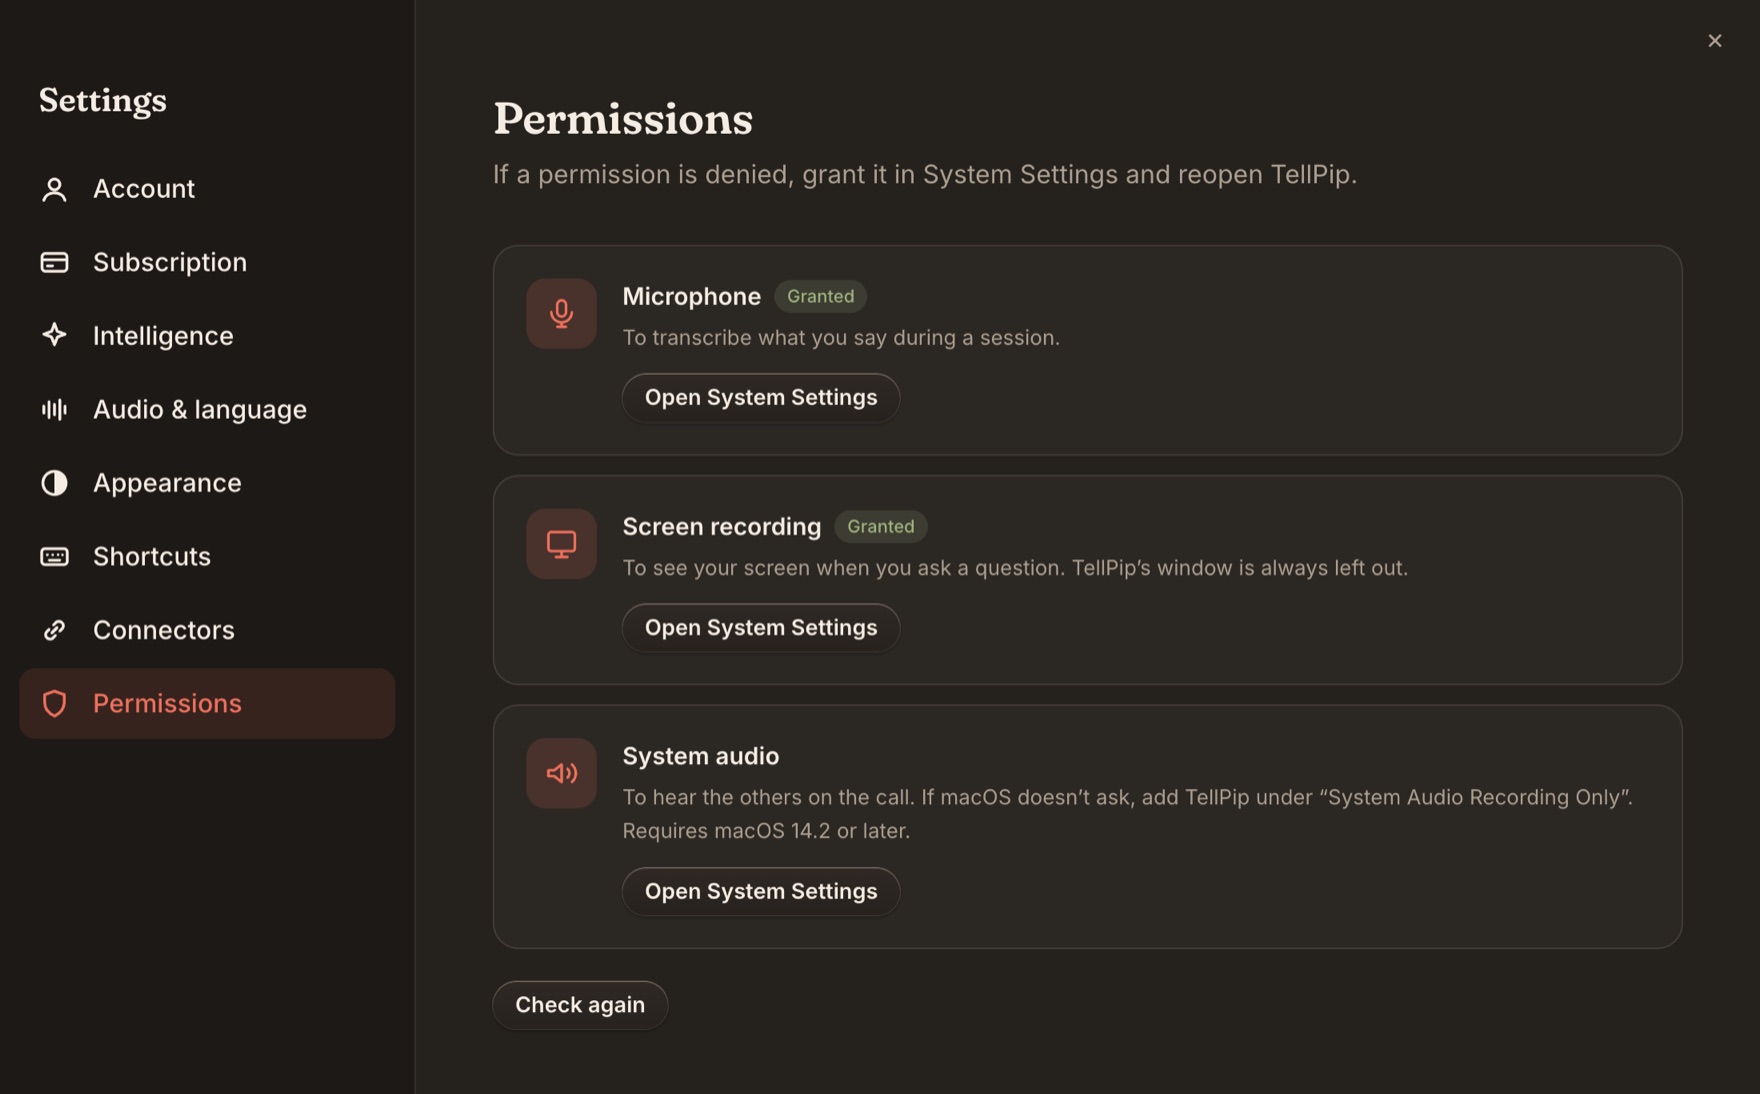
- Microphone: to transcribe what you say during a session.
- Screen recording: to see what’s on your screen when you ask a question, so Pip can answer about the slide, email or document in front of you. TellPip’s own windows are always left out of the screenshot.
- System audio: to hear the other people in the call. Their voices reach TellPip through your computer’s audio, whatever app you use for the call: Zoom, Google Meet, Microsoft Teams, Webex or any other.
The audio is turned into text right on your computer, thanks to the local model, and never leaves it. See What stays on your computer.
2. Check them in Settings
Open Settings → Permissions. The page shows Microphone, Screen recording and System audio, each with its status:
- Granted: all set.
- Denied: the permission was refused. You can turn it on at any time in System Settings.
- Not asked yet: macOS hasn’t shown the request yet. Press Request now.
- Restricted: your Mac is managed by an installed profile, often a company one. To enable it, ask whoever manages your Mac.
- Unknown: macOS hasn’t reported the status yet. Press Check again to refresh it.
Next to these two permissions you’ll find three buttons that make everything quick:
- Request now asks macOS for the permission, with the system’s usual window.
- Open System Settings takes you straight to the right page in macOS.
- Check again refreshes the status after you change something.
For System audio you’ll find the Open System Settings button, which takes you straight to the macOS page where you turn it on. The simplest way to check it is to start a session: when the others’ voices appear in the transcript, everything is ready. And if the others’ audio doesn’t come through, TellPip tells you and tries again by itself.
3. Microphone and Screen recording
- In Settings → Permissions, press Request now next to Microphone.
- macOS asks whether TellPip may use the microphone: choose Allow.
- Repeat the same step for Screen recording. If macOS sends you to System Settings, switch TellPip on in the list.
- Back in TellPip, press Check again: the status changes to Granted.
4. System audio, step by step
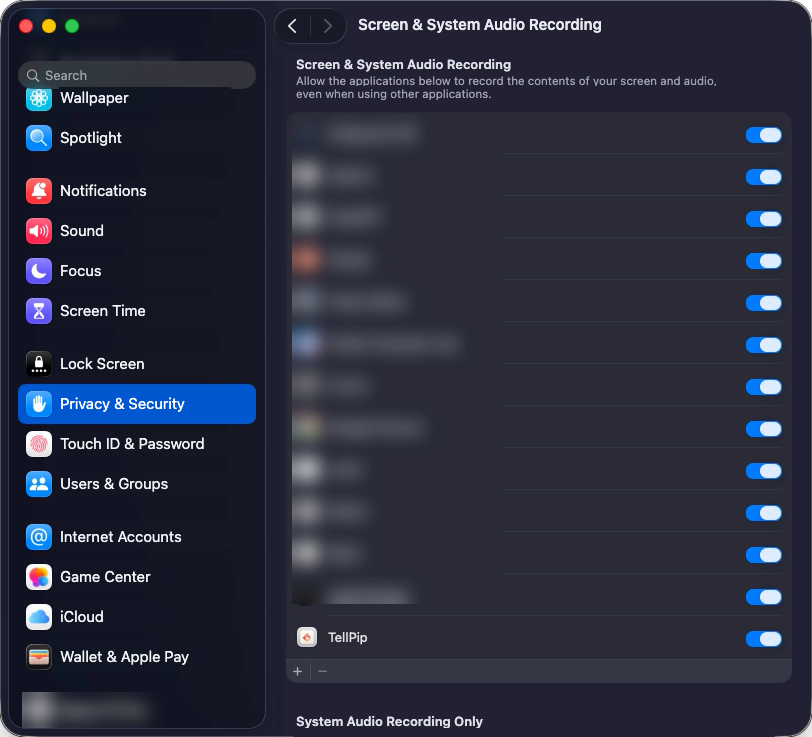
In most cases macOS asks for access to system audio the first time you start a session: say yes and you’re done. If you’d rather turn it on by hand, or want to enable it later, follow these steps:
- In Settings → Permissions, press Open System Settings next to System audio, or open System Settings → Privacy & Security → Screen & System Audio Recording.
- Find TellPip in the list and switch it on. If it isn’t there, add it with the + button.
- Quit TellPip and open it again, then start a session: the other participants’ voices appear in the transcript.
5. Quick checks
- Just granted a permission? Quit and reopen TellPip: as the Permissions page says, macOS applies some permissions when the app restarts.
- Want the other participants transcribed too? Check that system audio is on. See Let Pip hear everyone on the call.
- Want to check your microphone? Make sure it isn’t muted and see which input is selected in System Settings → Sound. See Set up your microphone for the best results.
- Want Pip to see your screen? Check that Screen recording is granted and that Use the screen is on. Pip looks at the display the chat is on.
6. Next steps
With the permissions ready, let the first-launch download finish and try your first call.
macOS protegge con cura ciò che accade sul tuo Mac: nessuna app può usare il microfono, vedere lo schermo o ascoltare l’audio del Mac senza il tuo consenso. TellPip utilizza tre di questi permessi, ciascuno con uno scopo preciso. In questa guida trovi a cosa serve ognuno, come concederlo e come verificare in qualsiasi momento che sia tutto pronto.
1. I tre permessi, e perché
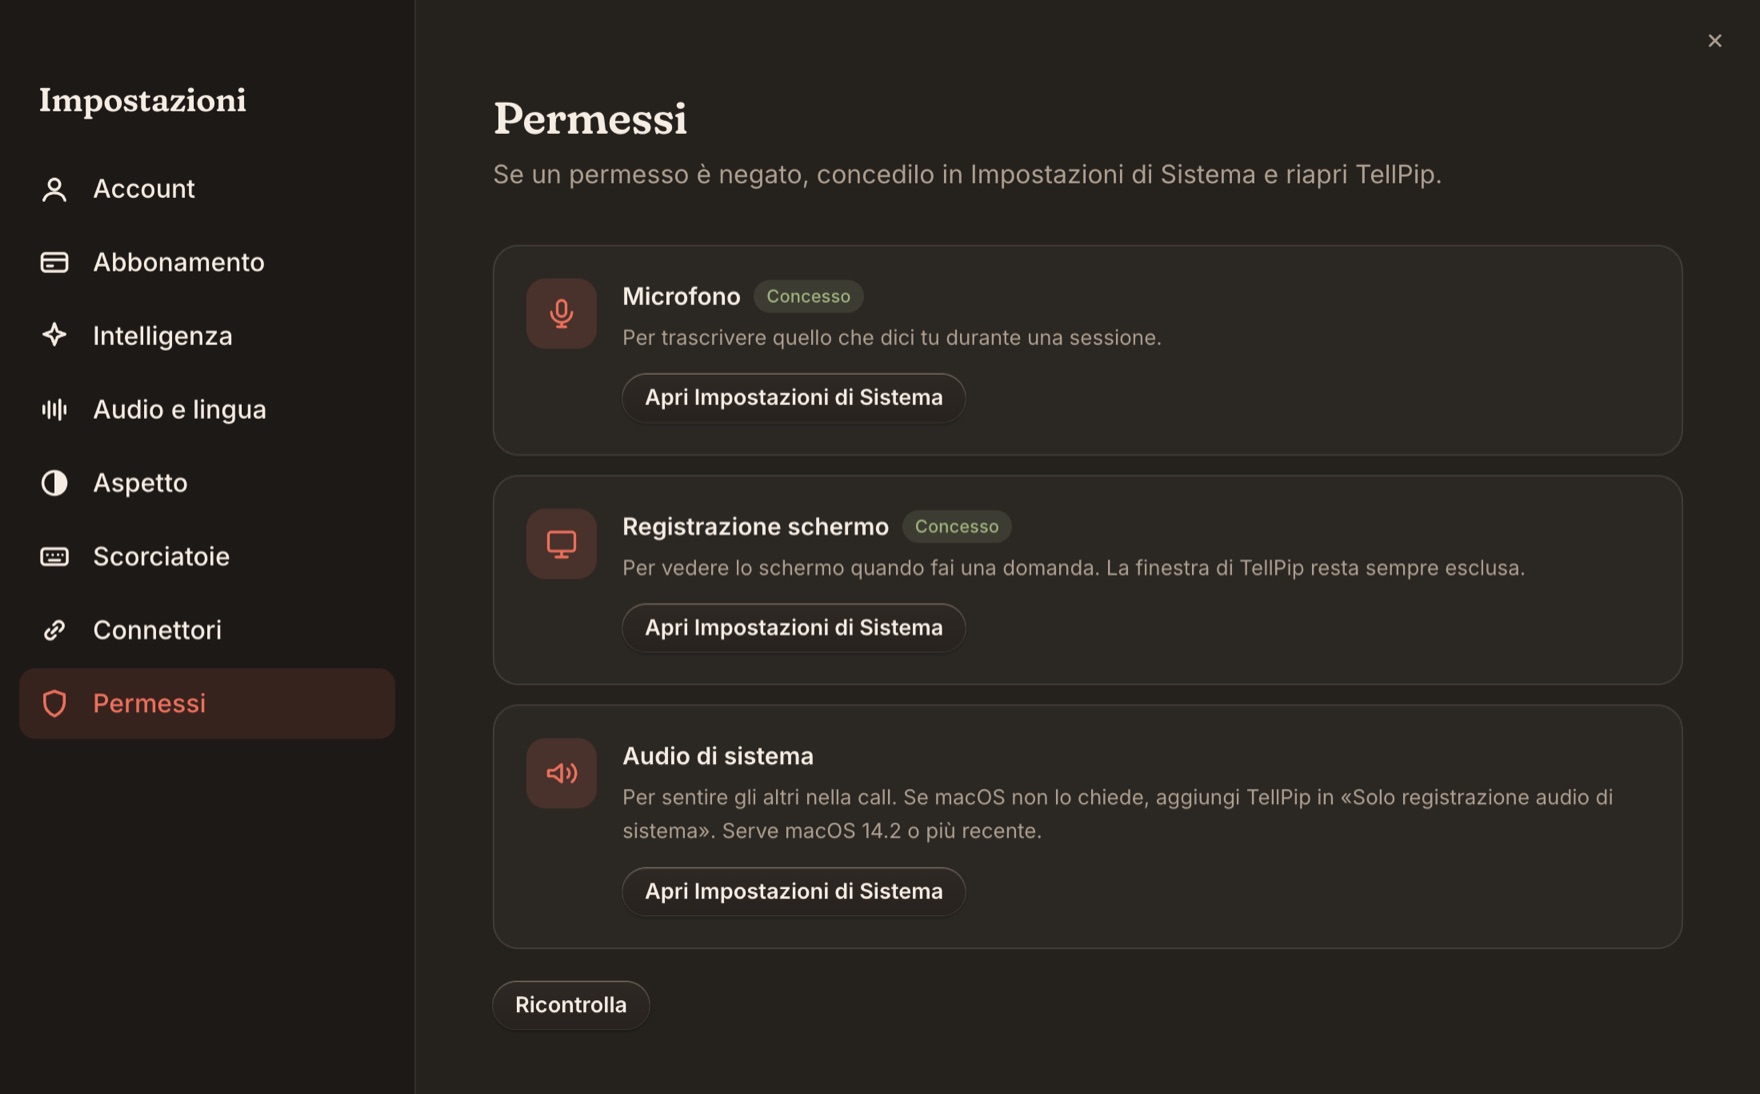
- Microfono: per trascrivere ciò che dici tu durante una sessione.
- Registrazione schermo: per vedere cosa c’è sullo schermo quando fai una domanda, così Pip può rispondere sulla slide, sull’email o sul documento che hai davanti. Le finestre di TellPip restano sempre fuori dallo screenshot.
- Audio di sistema: per ascoltare le altre persone in call. Le loro voci arrivano a TellPip attraverso l’audio del computer, qualunque app tu usi per la call: Zoom, Google Meet, Microsoft Teams, Webex o qualsiasi altra.
L’audio diventa testo direttamente sul tuo computer, grazie al modello locale, e non lo lascia mai. Vedi Cosa resta sul tuo computer.
2. Controllali dalle Impostazioni
Apri Impostazioni → Permessi. La pagina mostra Microfono, Registrazione schermo e Audio di sistema, ognuno con il suo stato:
- Concesso: tutto pronto.
- Negato: il permesso è stato rifiutato. Puoi attivarlo in qualsiasi momento da Impostazioni di Sistema.
- Da chiedere: macOS non ha ancora mostrato la richiesta. Premi Richiedi ora.
- Bloccato: il Mac è gestito da un profilo installato, spesso aziendale. Per abilitarlo rivolgiti a chi amministra il tuo Mac.
- Sconosciuto: macOS non ha ancora comunicato lo stato. Premi Ricontrolla per aggiornarlo.
Accanto a questi due permessi trovi tre pulsanti che rendono tutto immediato:
- Richiedi ora chiede il permesso a macOS, con la consueta finestra di sistema.
- Apri Impostazioni di Sistema ti porta direttamente alla pagina giusta di macOS.
- Ricontrolla aggiorna lo stato dopo una modifica.
Per Audio di sistema trovi il pulsante Apri Impostazioni di Sistema, che ti porta direttamente alla pagina di macOS dove attivarlo. Il modo più semplice per verificarlo è avviare una sessione: quando le voci degli altri compaiono nella trascrizione, è tutto pronto. E se l’audio degli altri non arriva, TellPip te lo segnala e riprova da solo.
3. Microfono e Registrazione schermo
- In Impostazioni → Permessi, premi Richiedi ora accanto a Microfono.
- macOS ti chiede se TellPip può usare il microfono: scegli Consenti.
- Ripeti lo stesso passaggio per Registrazione schermo. Se macOS ti porta in Impostazioni di Sistema, attiva TellPip nell’elenco.
- Torna in TellPip e premi Ricontrolla: lo stato diventa Concesso.
4. Audio di sistema, passo per passo
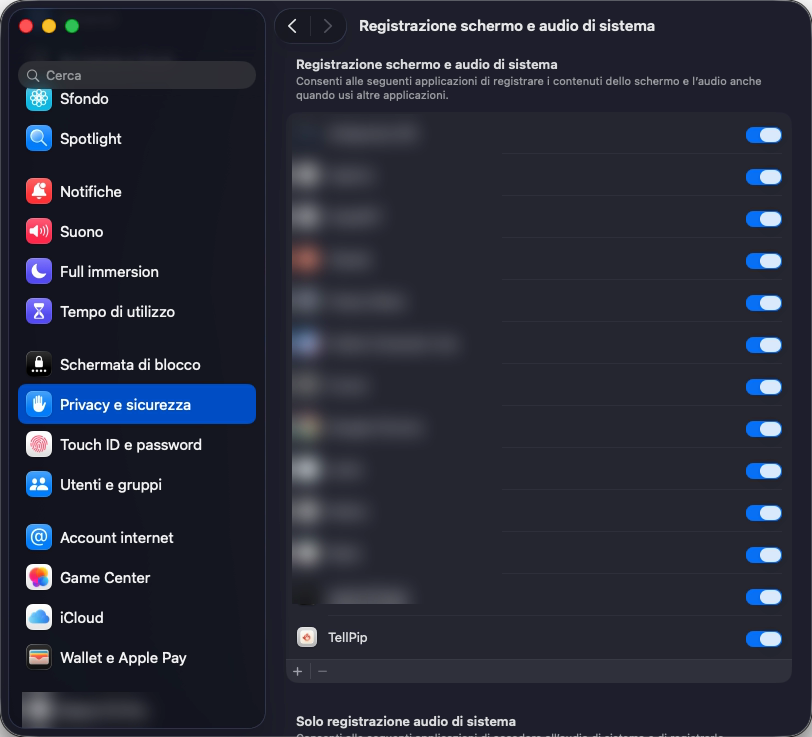
Nella maggior parte dei casi macOS chiede l’accesso all’audio di sistema la prima volta che avvii una sessione: rispondi di sì e hai finito. Se preferisci attivarlo manualmente, oppure vuoi abilitarlo in un secondo momento, segui questi passaggi:
- In Impostazioni → Permessi premi Apri Impostazioni di Sistema accanto ad Audio di sistema, oppure apri Impostazioni di Sistema → Privacy e sicurezza → Registrazione schermo e audio di sistema.
- Cerca TellPip nell’elenco e attivalo. Se non c’è, aggiungilo con il pulsante +.
- Chiudi TellPip e riaprilo, poi avvia una sessione: le voci degli altri partecipanti compaiono nella trascrizione.
5. Verifiche rapide
- Hai appena concesso un permesso? Chiudi e riapri TellPip: come indicato nella pagina Permessi, macOS applica alcuni permessi al riavvio dell’app.
- Vuoi trascrivere anche gli altri partecipanti? Verifica che l’audio di sistema sia attivo. Vedi Fai sentire a Pip tutti i partecipanti.
- Vuoi verificare il tuo microfono? Controlla che non sia disattivato e quale ingresso è selezionato in Impostazioni di Sistema → Suono. Vedi Configura al meglio il microfono.
- Vuoi che Pip veda lo schermo? Verifica che la Registrazione schermo sia concessa e che Usa lo schermo sia attivo. Pip osserva lo schermo su cui si trova la chat.
6. I prossimi passi
Con i permessi pronti, lascia completare il download al primo avvio e prova la tua prima call.
Related articles
Need anything else? We’re here for you.
Write to us