 TellPip
Let Pip hear everyone on the call
How to set up system audio so Pip transcribes your voice and the voices of everyone else on the call.
Updated 30 October 2026
Contents
1. How TellPip listens to a call
TellPip listens to two audio sources side by side, and turns them into text right on your computer thanks to its local model, which recognises the spoken language on its own, even if it changes halfway through the call:
- your microphone, for everything you say;
- your computer’s audio, for everything the other participants say. This is the same sound you hear in your headphones or speakers.
To get both your voice and the voices of the people you’re talking to in the transcript, both sources must be on. In this guide you set up the second one, your computer’s audio, step by step: it only takes a few minutes, and from then on Pip hears the whole conversation in every call. Follow the steps in order.
2. Check that Pip is listening
TellPip starts listening as soon as you open it, and opening the chat with Psst… or ⌘ \ starts listening. For an instant check, turn on Live transcript from the chat’s ••• menu: you’ll see the sentences appear as people speak.
3. Join the call from this computer
TellPip listens to what your computer plays. That’s why the call needs to go through the computer you use TellPip on: join the meeting from the browser or from the call app (Zoom, Google Meet, Microsoft Teams, Webex or any other). If you’re following the meeting from a phone, another computer or a meeting room system, join from that computer as well to have Pip by your side.
4. Give the system audio permission
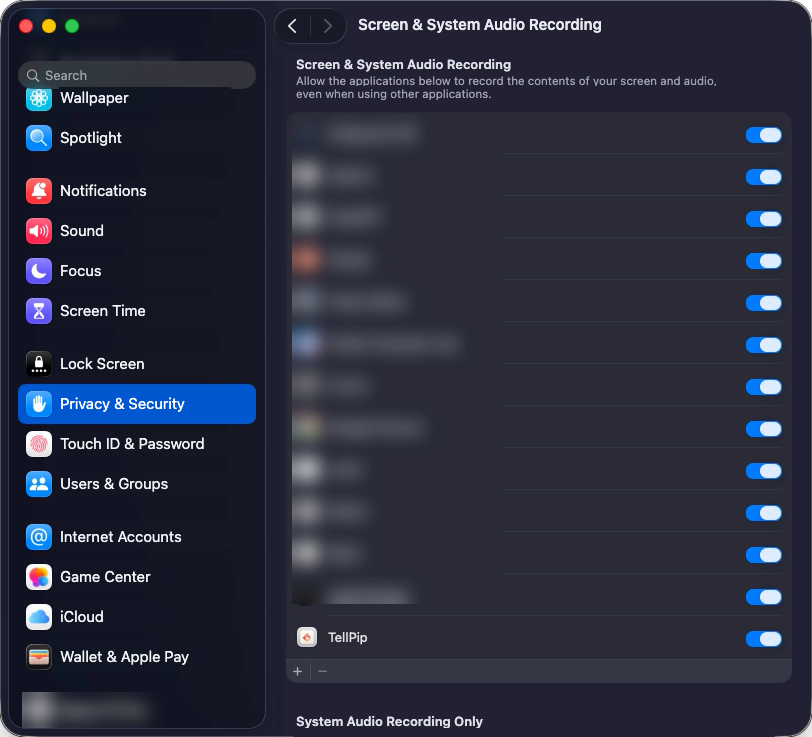
To hear the other participants, macOS must allow TellPip to record the system audio. macOS usually asks you at the first session. To give it or check it at any time:
- Open Settings → Permissions and, next to System audio, press Open System Settings.
- Privacy & Security → Screen & System Audio Recording opens.
- Find TellPip in the list and switch it on. If it isn’t there, add it with the + button.
- Quit and reopen TellPip: the new permission works straight away.
5. TellPip keeps you informed
TellPip follows the other participants’ audio for the whole call. If for a moment it doesn’t receive it, for example because the call isn’t going through the computer yet, it tells you in the chat and tries again on its own: as soon as the audio arrives, the transcript starts again without you having to do anything.
The same goes for headphones and AirPods: if you connect or disconnect them halfway through the call, TellPip follows them on its own and keeps listening. And while the others are speaking, your microphone stays quiet, so the transcript doesn’t pick up the echo of their voices.
6. End and restart the session
If you have just given the permission, end the session with ⌘ ⇧ \ and start it again: TellPip applies the new settings straight away.
Quick check
- The chat is open and the Live transcript shows your voice.
- The call is playing on this computer and you can hear it.
- TellPip is switched on in Screen & System Audio Recording.
- The Mac has macOS 14.2 or later.
- You reopened TellPip after granting the permission.
7. Names and terms spelled correctly
With the audio set up, Pip transcribes every participant. For an even more precise transcript of names, brands and technical terms, add them to the Vocabulary, for example Salesforce = sales force: TellPip will spell them correctly during the call.
8. Learn more
Find out about all of TellPip’s permissions in the guide to macOS permissions. For your own voice, read Set up your microphone for the best results. And if you’d like personal help, open the About TellPip window and choose Contact support: write what happened, look at the technical report with See what we send and send it. You’ll get a reference number, and someone from our team will reply.
1. Come TellPip ascolta una call
TellPip ascolta due fonti audio in parallelo, e le trasforma in testo direttamente sul tuo computer grazie al suo modello locale, che riconosce da solo la lingua parlata, anche se cambia a metà call:
- il tuo microfono, per tutto ciò che dici tu;
- l’audio del tuo computer, per tutto ciò che dicono gli altri partecipanti. È lo stesso suono che senti in cuffia o dagli altoparlanti.
Per avere nella trascrizione sia la tua voce sia quella dei tuoi interlocutori, entrambe le fonti devono essere attive. In questa guida configuri passo passo la seconda, l’audio del computer: bastano pochi minuti, e da quel momento Pip ascolta l’intera conversazione in ogni call. Segui i passaggi nell’ordine.
2. Verifica che Pip stia ascoltando
TellPip inizia ad ascoltare appena lo apri, e aprire la chat con Psst… o ⌘ \ avvia l’ascolto. Per una verifica immediata, attiva Trascrizione in diretta dal menu ••• della chat: vedrai comparire le frasi mentre le persone parlano.
3. Partecipa alla call da questo computer
TellPip ascolta ciò che il tuo computer riproduce. Per questo la call deve passare dal computer su cui usi TellPip: entra nella riunione dal browser o dall’app della call (Zoom, Google Meet, Microsoft Teams, Webex o qualsiasi altra). Se segui la riunione da un telefono, da un altro computer o dall’impianto di una sala riunioni, collegati anche da quel computer per avere Pip al tuo fianco.
4. Concedi il permesso per l’audio di sistema
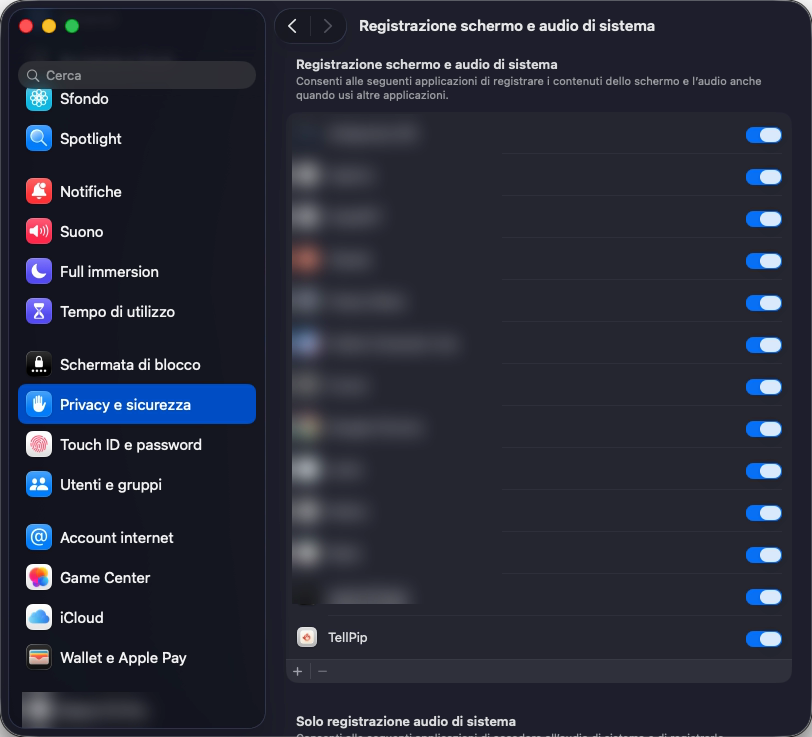
Per ascoltare gli altri partecipanti, macOS deve autorizzare TellPip a registrare l’audio di sistema. In genere macOS te lo chiede alla prima sessione. Per concederlo o verificarlo in qualsiasi momento:
- Apri Impostazioni → Permessi e, alla voce Audio di sistema, premi Apri Impostazioni di Sistema.
- Si apre Privacy e sicurezza → Registrazione schermo e audio di sistema.
- Cerca TellPip nell’elenco e attivalo. Se non c’è, aggiungilo con il pulsante +.
- Chiudi e riapri TellPip: il nuovo permesso è subito operativo.
5. TellPip ti tiene informato
TellPip segue l’audio degli altri partecipanti per tutta la call. Se per un momento non lo riceve, per esempio perché la call non passa ancora dal computer, te lo segnala nella chat e riprova da solo: appena l’audio arriva, la trascrizione riparte senza che tu debba fare nulla.
Lo stesso vale per cuffie e AirPods: se le colleghi o le scolleghi a metà call, TellPip le segue da solo e continua ad ascoltare. E mentre parlano gli altri, il tuo microfono resta in silenzio, così la trascrizione non riporta l’eco della loro voce.
6. Termina e riavvia la sessione
Se hai appena concesso il permesso, termina la sessione con ⌘ ⇧ \ e avviala di nuovo: TellPip applica subito le nuove impostazioni.
Controllo rapido
- La chat è aperta e la Trascrizione in diretta mostra la tua voce.
- La call viene riprodotta da questo computer e tu la senti.
- TellPip è attivo in Registrazione schermo e audio di sistema.
- Il Mac ha macOS 14.2 o successivo.
- Hai riaperto TellPip dopo aver concesso il permesso.
7. Nomi e termini scritti correttamente
Con l’audio configurato, Pip trascrive tutti i partecipanti. Per una trascrizione ancora più precisa su nomi, marchi e termini tecnici, aggiungili al Vocabolario, per esempio Salesforce = sales force: TellPip li scriverà correttamente già durante la call.
8. Per approfondire
Scopri tutti i permessi di TellPip nella guida ai permessi di macOS. Per la tua voce, leggi Configura al meglio il microfono. E se vuoi un aiuto personale, apri la finestra Informazioni su TellPip e scegli Contatta l’assistenza: scrivi cosa è successo, guarda il rapporto tecnico con Vedi cosa inviamo e invia. Riceverai un numero di riferimento, e una persona del nostro team ti risponderà.
Related articles
Need anything else? We’re here for you.
Write to us