 TellPip
Set up your microphone for the best results
How to choose the right microphone, what each message means and how to always get a clear transcript of your voice.
Updated 30 October 2026
Contents
1. Which microphone TellPip uses
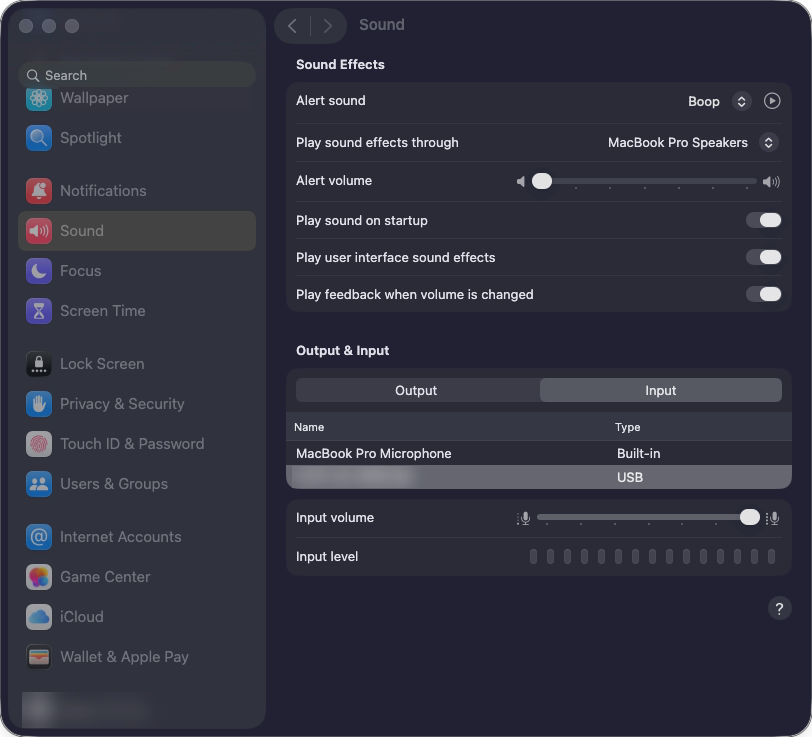
TellPip uses the microphone selected on your Mac, the one shown in System Settings → Sound → Input. It’s usually the same one your call app uses, so you don’t have to set anything up twice. If you connect or disconnect headphones or AirPods, even halfway through a call, TellPip follows the change on its own and keeps listening to you. And while the others are speaking, your microphone stays quiet: the transcript has your voice, without the echo of the other participants.
TellPip always keeps you informed: if the microphone needs your attention, a clear message appears in the chat. Below you’ll find what each one means and the steps to follow.
2. “Microphone unavailable”
TellPip needs your permission to use the microphone. Here’s how to give it:
- Open Settings → Permissions → Microphone.
- If it says Denied, press Open System Settings and switch TellPip on.
- If it says Not asked yet, press Request now and allow it.
- Press Check again. To apply the change straight away, quit and reopen TellPip.

3. “Microphone unavailable: no audio input found”
Your computer needs you to select an audio input, for example after you’ve unplugged a headset.
- Open System Settings → Sound → Input.
- Choose a microphone from the list, for example the computer’s built-in one.
- Pip starts listening to you again from the new input.
4. The microphone level
If the microphone is selected but there’s no signal, the message includes the device name, so you know exactly which one to check.
- Is it muted? Check the mute button on the headset, on the cable and in the call app.
- Is it the right input? In System Settings → Sound → Input, speak and watch the level move.
- Is the input volume right? Adjust it on the same screen.
5. Changing microphone during the call
You can change microphone whenever you like, even once the call has started: if you plug in your headphones, switch to AirPods or go back to the built-in microphone, TellPip follows the new input on its own and the session carries on without interruption.
- Connect the new microphone, or choose it in Sound → Input.
- Keep talking: the transcript carries on in the same session, without losing anything.
- If you had already ended the session, open it in Sessions, in the main window, and press ▶ Resume.
6. Other messages
- The transcription model is downloading…: the first time it starts, TellPip installs its local speech model, which transcribes everything right on your computer. Transcription starts by itself as soon as the installation is complete. See the first-launch download.
- Transcription failed or Voice detection unavailable: end the session with ⌘ ⇧ \ and start it again. To start from scratch, quit and reopen TellPip; if you’d like personal help, use Contact support.
7. Test before an important call
- Open the chat with ⌘ \: TellPip starts listening.
- Turn on Live transcript from the chat’s ••• menu.
- Say two or three sentences out loud: you’ll see them appear in black and white.
- End the session with ⌘ ⇧ \: the main window opens on the session, with the full Transcript.
Then delete the test session from its ••• menu.
8. Quick check and next steps
- TellPip has the microphone permission (Granted).
- The right input is selected in System Settings → Sound.
- The microphone is on and the level moves when you speak.
- You reopened TellPip after granting the permission.
Would you like personal help? Open the About TellPip window and choose Contact support: describe what happened, look at the technical report with See what we send and send it. You’ll get a reference number. Find out about all of TellPip’s permissions too.
1. Quale microfono usa TellPip
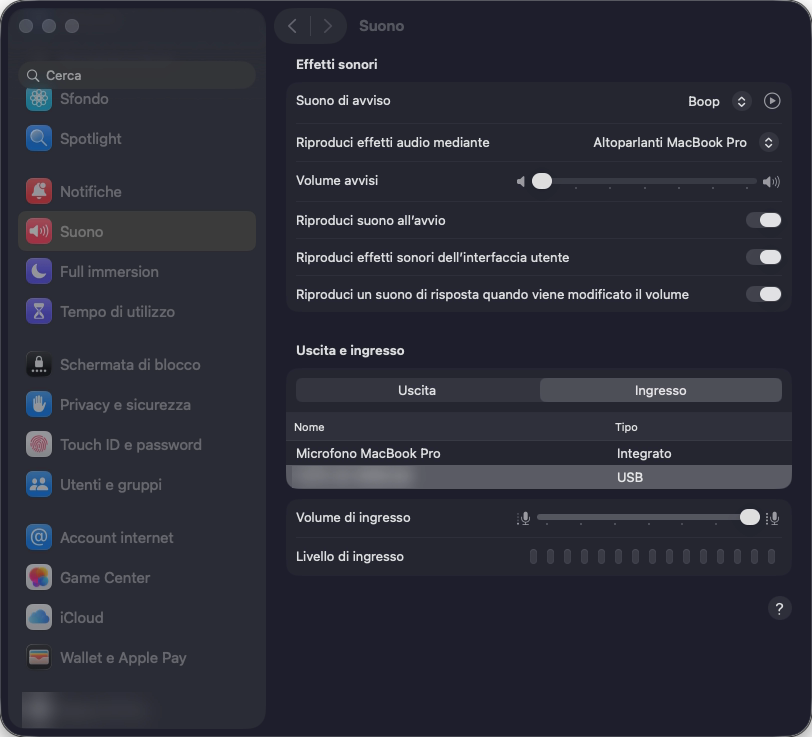
TellPip usa il microfono selezionato sul tuo Mac, quello indicato in Impostazioni di Sistema → Suono → Ingresso. Di solito è lo stesso che usa l’app della call, così non devi configurare nulla due volte. Se colleghi o scolleghi cuffie o AirPods, anche a metà call, TellPip segue da solo il cambio e continua ad ascoltarti. E mentre parlano gli altri, il tuo microfono resta in silenzio: la trascrizione riporta la tua voce, senza l’eco degli altri partecipanti.
TellPip ti tiene sempre informato: se il microfono richiede la tua attenzione, nella chat compare un messaggio chiaro. Qui sotto trovi il significato di ciascuno e i passaggi da seguire.
2. «Microfono non disponibile»
TellPip ha bisogno del tuo permesso per usare il microfono. Ecco come concederlo:
- Apri Impostazioni → Permessi → Microfono.
- Se indica Negato, premi Apri Impostazioni di Sistema e attiva TellPip.
- Se indica Da chiedere, premi Richiedi ora e autorizzalo.
- Premi Ricontrolla. Per applicare subito la modifica, chiudi e riapri TellPip.

3. «Microfono non disponibile: nessun ingresso audio trovato»
Il computer ha bisogno che tu selezioni un ingresso audio, per esempio dopo aver scollegato delle cuffie.
- Apri Impostazioni di Sistema → Suono → Ingresso.
- Scegli un microfono dall’elenco, per esempio quello integrato nel computer.
- Pip riprende ad ascoltarti dal nuovo ingresso.
4. Il livello del microfono
Se il microfono è selezionato ma il segnale è assente, il messaggio riporta il nome del dispositivo, così sai esattamente quale verificare.
- È silenziato? Controlla il tasto muto sulle cuffie, sul cavo e nell’app della call.
- È l’ingresso giusto? In Impostazioni di Sistema → Suono → Ingresso, parla e osserva il livello muoversi.
- Il volume d’ingresso è adeguato? Regolalo nella stessa schermata.
5. Cambiare microfono durante la call
Puoi cambiare microfono quando vuoi, anche a call iniziata: se colleghi le cuffie, passi agli AirPods o torni al microfono integrato, TellPip segue da solo il nuovo ingresso e la sessione prosegue senza interruzioni.
- Collega il nuovo microfono, oppure sceglilo in Suono → Ingresso.
- Continua a parlare: la trascrizione prosegue nella stessa sessione, senza perdere nulla.
- Se avevi già terminato la sessione, aprila in Sessioni, nella finestra principale, e premi ▶ Riprendi.
6. Altri messaggi
- Il modello di trascrizione si sta scaricando…: al primo avvio TellPip installa il suo modello vocale locale, che trascrive tutto direttamente sul tuo computer. La trascrizione parte da sola appena l’installazione è completata. Vedi il download al primo avvio.
- Trascrizione non riuscita o Rilevamento della voce non disponibile: termina la sessione con ⌘ ⇧ \ e avviala di nuovo. Per ripartire da zero, chiudi e riapri TellPip; se desideri un aiuto personale, usa Contatta l’assistenza.
7. Prova prima di una call importante
- Apri la chat con ⌘ \: TellPip inizia ad ascoltare.
- Attiva Trascrizione in diretta dal menu ••• della chat.
- Di’ ad alta voce due o tre frasi: le vedrai comparire nero su bianco.
- Termina la sessione con ⌘ ⇧ \: si apre la finestra principale sulla sessione, con la Trascrizione completa.
Poi elimina la sessione di prova dal suo menu •••.
8. Controllo rapido e prossimi passi
- TellPip ha il permesso del microfono (Concesso).
- In Impostazioni di Sistema → Suono è scelto l’ingresso giusto.
- Il microfono è attivo e il livello si muove quando parli.
- Hai riaperto TellPip dopo aver concesso il permesso.
Vuoi un aiuto personale? Apri la finestra Informazioni su TellPip e scegli Contatta l’assistenza: descrivi cosa è successo, guarda il rapporto tecnico con Vedi cosa inviamo e invia. Riceverai un numero di riferimento. Scopri anche tutti i permessi di TellPip.
Related articles
Need anything else? We’re here for you.
Write to us